Rembrandt lighting is one of the first portrait setups we teach at our Queens studio, mostly because it looks so dramatic for so little gear. You need one light, a subject, and a little patience while you move things around. Once it clicks, you can set it up anywhere in a couple of minutes.
The look is simple to describe. One side of the face is lit, and the other side falls into shadow except for a small triangle of light on the cheek, just below the eye. The name comes from the Dutch painter, whose portraits often show that same pattern. If you want to see it for yourself, the 1659 self-portrait held by the National Gallery of Art is a great reference, with light falling from the upper left and deep shadow on the far side. Below, we’ll walk through how to recreate that look with a single light, step by step.
What You Need
You won’t need much gear. Any single light will do, whether that’s a studio strobe, a speedlight, an LED panel, or a big window. Adding a small softbox or umbrella will give you softer shadows, but you can also leave it bare if you want a harsher, moodier portrait. The one thing you really shouldn’t skip is a light stand, since the light has to sit higher than your subject’s head for this to work.
A reflector is optional but useful, and so is a darker background. Rembrandt lighting looks its best when the shadows can fall away, so a gray or black photography backdrop usually works better than a bright white wall that bounces light back onto your subject.
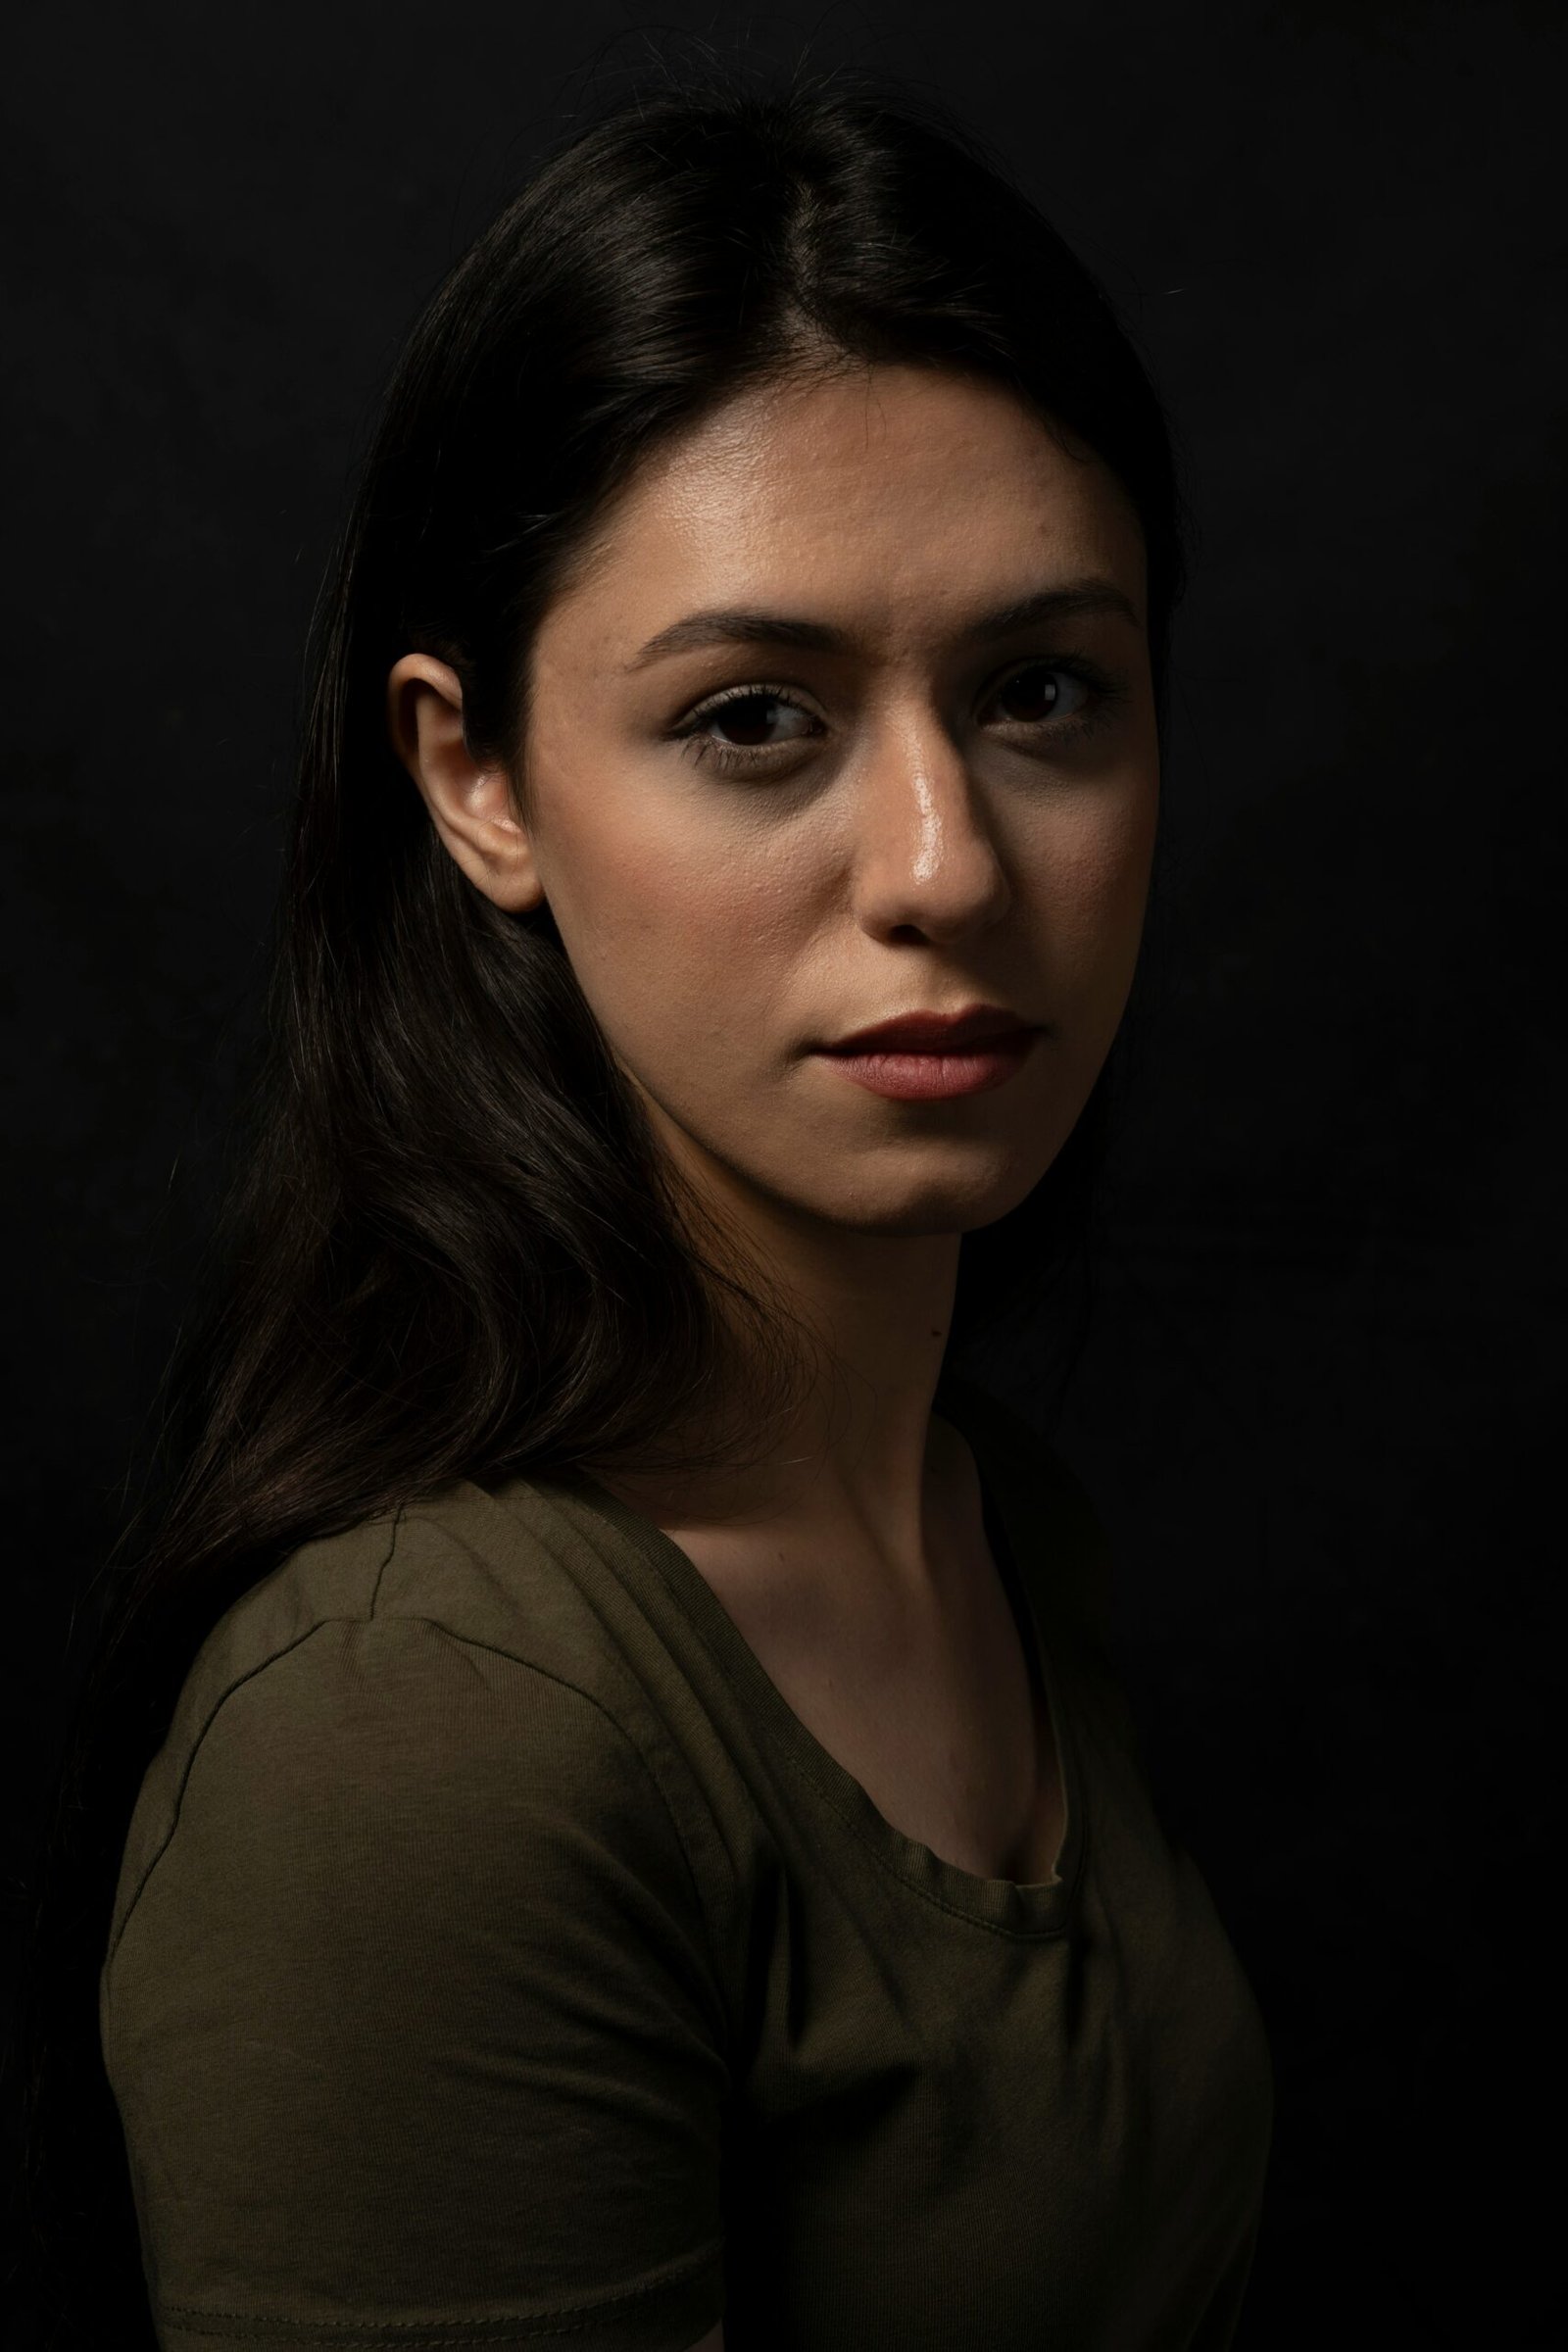
Step 1: Start in a Dim Room
Because this setup depends on shadow, it works best when your light is the only thing lighting the subject. Turn off overhead lights and close the blinds if you can. Extra light from the room fills in the shadow side of the face and makes it hard to see the triangle form. If you’re using a strobe, a modeling light will help you see where the light is falling before you take a shot.
Step 2: Set Up
Start by setting a stool a few feet in front of your backdrop and asking your subject to sit. Position your camera directly facing them, and have them look into the lens for now. The gap between your subject and the wall is important, because it keeps most of the light from spilling onto the backdrop. That way the background stays dark, and your subject’s face is what stands out.
Step 3: Position the Light
With your subject in place, move the light off to one side of them. Start with it at roughly a 45 degree angle to the direction their nose points. You’ll find that a lot of photographers go wider than that, and B&H’s portrait setup guide suggests something closer to 55 or 60 degrees from the camera. From your starting point, move the light out a little at a time and keep an eye on your subject’s face. Stop once the shadows land where you want them.
Step 4: Raise the Light and Angle It Down
This is the step people most often skip. Raise the light so it sits above your subject’s head, then tilt it down toward their face. For a seated subject, that usually means extending the stand to around six feet. The downward angle is what creates the shadow from the nose that forms the lower edge of the triangle. If the light is at eye level, you’ll get a side-lit face but no triangle.
Step 5: Look for the Triangle
Now look at the shadow side of the face, the side farthest from the light. You’re looking for a small, upside-down triangle of light on the cheek, bordered by the shadow of the nose on one side and the shadow of the cheekbone on the other. As a general guide, the triangle should be about as wide as the eye and no longer than the nose.
Don’t worry if it isn’t a perfect triangle every time. Every face is shaped differently, and what matters is that the pattern looks flattering and intentional.
Step 6: Adjust Until It’s Right
Small changes make a big difference, so move one thing at a time and watch what happens. If there’s no triangle at all and the shadow side is completely dark, the light is probably too far to the side or too high. Bring it slightly forward or lower it a little.
If the triangle is too big and runs down into the cheek, or the whole face looks mostly lit, the light is too close to the camera. Move it farther to the side. If the triangle is there but the eye on the shadow side is dark, lower the light slightly so it can reach into the eye socket. You can also ask your subject to turn their head a few degrees toward or away from the light, which is often faster than moving the stand.
Step 7: Decide How Dark You Want the Shadows
A true one-light Rembrandt setup has deep, dramatic shadows. That’s perfect for moody portraits, but you might want something a little softer for a professional headshot or a family photo. That’s where a reflector comes in.
Place a white reflector on the shadow side of the face, angled back toward your subject. It bounces some of your main light back into the shadows and softens the contrast without adding a second light. Move it closer for more fill and farther away for less. A silver reflector gives brighter, crisper fill, while white gives a gentler lift.
Step 8: Set Your Camera
If you’re using a strobe, set your shutter speed at or below your camera’s flash sync speed, often around 1/200 of a second, and control brightness with your aperture and flash power. An aperture around f/5.6 to f/8 keeps the whole face sharp. With continuous light or a window, you’ll likely need a wider aperture and a slightly higher ISO to get enough light, so watch your shutter speed to avoid blur.
Choosing Which Side of the Face to Light
Most people have a side of their face they prefer, so ask your subject before you start. The way they part their hair, a small scar, or a simple habit can make one side feel more natural. Once you know, place the light on that side to brighten the features they like best.
Head position also changes the effect. If your subject turns slightly away from the light, you’re lighting the side of the face farther from the camera, which photographers call short lighting. That combination tends to slim the face and adds even more drama. If they turn toward the light, more of the face nearest the camera gets lit, and the look becomes a little softer and broader. Try both and see which one suits the person in front of you.
Using a Window Instead of a Studio Light
You don’t need studio gear to try this. A window can work beautifully as your single light source, especially one that isn’t getting direct sun. Place your subject at an angle to the window so the light hits one side of the face, then have them turn their head slowly until you see the triangle appear on the far cheek. Since you can’t raise a window, you may need to have your subject sit a little lower than the window or tilt their chin slightly to get the nose shadow in the right place.
Common Mistakes to Avoid
The most common problem is leaving the light at eye level, which gives you split lighting or flat side lighting instead of the triangle. Another is too much light in the room, which washes out the shadows you’re trying to create. It’s also easy to make the triangle too large by keeping the light too close to the camera, which shifts the look toward loop lighting.
Finally, watch the eye on the shadow side. The triangle should include a bit of light in that eye so it doesn’t look like a dark hole. A slight catchlight on both eyes makes the portrait feel alive.
Practice With One Subject
The quickest way to get comfortable with Rembrandt lighting is to practice on one patient friend and take a lot of test shots. Move the light a little, take a photo, and compare. After a session or two, you’ll be able to see the triangle forming before you even look through the camera. It’s also a lighting style that looks especially striking in black-and-white photography, so try converting a few of your favorites.
If you’d like to learn lighting setups like this in person, Dan Doyle teaches photography courses at our Queens studio, where you can practice with professional lights and get real-time feedback.